The Pasta Man’s corzetti salsa di noci recipe: pasta with walnut sauce

Sick of spaghetti? Fed up with fusilli? This recipe, from Instagram star Mateo Zielonka (AKA The Pasta Man), is bang on the money, transforming pasta into a bowlful of coins.
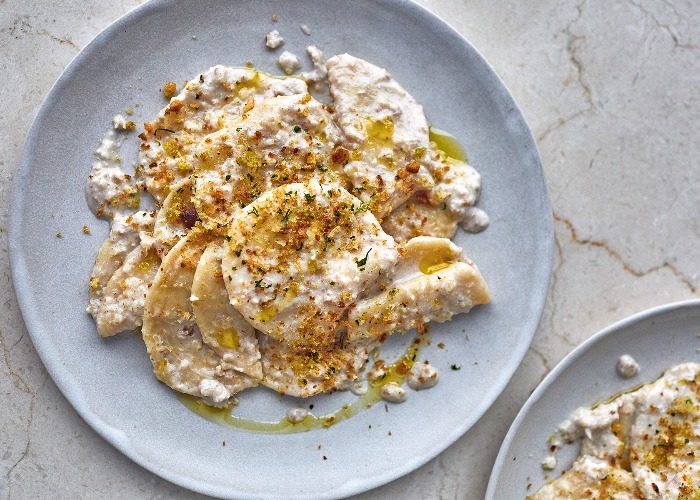
Corzetti, sometimes called croxetti, is nothing new. The tradition of embossing the pasta to resemble coins, or sometimes with noble families’ coats of arms, began in Liguria, northwest Italy, in the Middle Ages. The resulting shape, meant to mimic the regional capital Genoa’s currency, had a surprising added benefit: the stamped dough’s nooks and crannies give the sauce something to cling to.
A corzetti stamp usually comes in two parts: a base cutter for the circles of dough and a handled top part, each carved with a pattern which, when fitted together, embosses the dough on both sides. Corzetti is traditionally served with nutty sauces, such as this timeless, creamy walnut sauce, salsa di noci.
This recipe features in Mateo’s new cookbook, Pasta Masterclass: Recipes for Spectacular Pasta Doughs, Shapes, Fillings and Sauces. Mateo started his Instagram pasta journey in 2016, earning thousands of followers with his intricate pasta creations and his ability to transform comfort food into edible works of art.
Things to note:
To make the corzetti, you’ll need a pasta machine (or a pasta rolling pin) and a corzetti stamp.
You can knead the dough using a stand mixer with a dough hook attachment. Place the ingredients in the mixer bowl on low speed and mix steadily until the dough is formed. Continue from step 4.
The dough will need to rest for 30 minutes.
For US ingredients and measurements, use the drop-down menu and select 'Cups'.
Ingredients
- 280 g fine semolina
- 130 ml warm water
- 1 pinch salt
- 9.9 oz fine semolina
- 4.6 fl oz warm water
- 1 pinch salt
- 9.9 oz fine semolina
- 0.5 cup warm water
- 1 pinch salt
- 100 g walnuts
- 2 slices of soft bread, torn into pieces
- 175 ml milk
- 2 garlic cloves
- 0.5 lemon, juiced
- 3 tbsp olive oil
- 50 g Parmesan, finely grated
- 3.5 oz walnuts
- 2 slices of soft bread, torn into pieces
- 6.2 fl oz milk
- 2 garlic cloves
- 0.5 lemon, juiced
- 3 tbsp olive oil
- 1.8 oz Parmesan, finely grated
- 3.5 oz walnuts
- 2 slices of soft bread, torn into pieces
- 0.7 cup milk
- 2 garlic cloves
- 0.5 lemon, juiced
- 3 tbsp olive oil
- 1.8 oz Parmesan, finely grated
Details
- Cuisine: Italian
- Recipe Type: Pasta
- Difficulty: Medium
- Preparation Time: 60 mins
- Cooking Time: 10 mins
- Serves: 4
Step-by-step
For the semolina dough:
- Place the semolina in a large mixing bowl, add a pinch of salt and pour in the warm water.
- Combine with a fork – it will soon look like a crumble mix – and start to form the dough into a loose ball with your hands.
- As soon as the dough has come together, turn it onto a clean work surface or board and knead until it’s smooth and elastic – this will take about 10-15 minutes. Use the heel of one hand to push the dough away from you and use your other hand to turn it 90 degrees after each knead. You’ll soon develop a lovely rhythm.
- When the dough is smooth, form it into a flat disc; this will make it easier to roll out later. Place in an airtight container or under an upturned bowl to rest for 30 minutes.
- To shape the corzetti, start with a quarter of the dough, keeping the rest in an airtight container, and prepare a tray or baking sheet dusted with coarse semolina, on which to lay out your finished pasta.
- Roll out your dough. The dough needs to have a little thickness to allow for imprinting the pattern on both sides. Aim for a sheet around 3mm (0.1in) thick.
- Once you’ve rolled your dough, dust it with semolina on both sides and then, using the base of the corzetti stamp, gently twist it to cut out as many circles as you can from your sheet.
- Place a disc of dough on the stamp, pattern face up, then gently push the top down to sandwich the dough and apply just enough pressure to emboss it. Avoid twisting the handle or you’ll spoil the pattern.
- Gently remove and place the stamped pasta on the dusted tray. Repeat until you have a lovely pile of medallions. The scraps of leftover dough can be balled together and re-rolled to give a fresh and smooth sheet to work with.
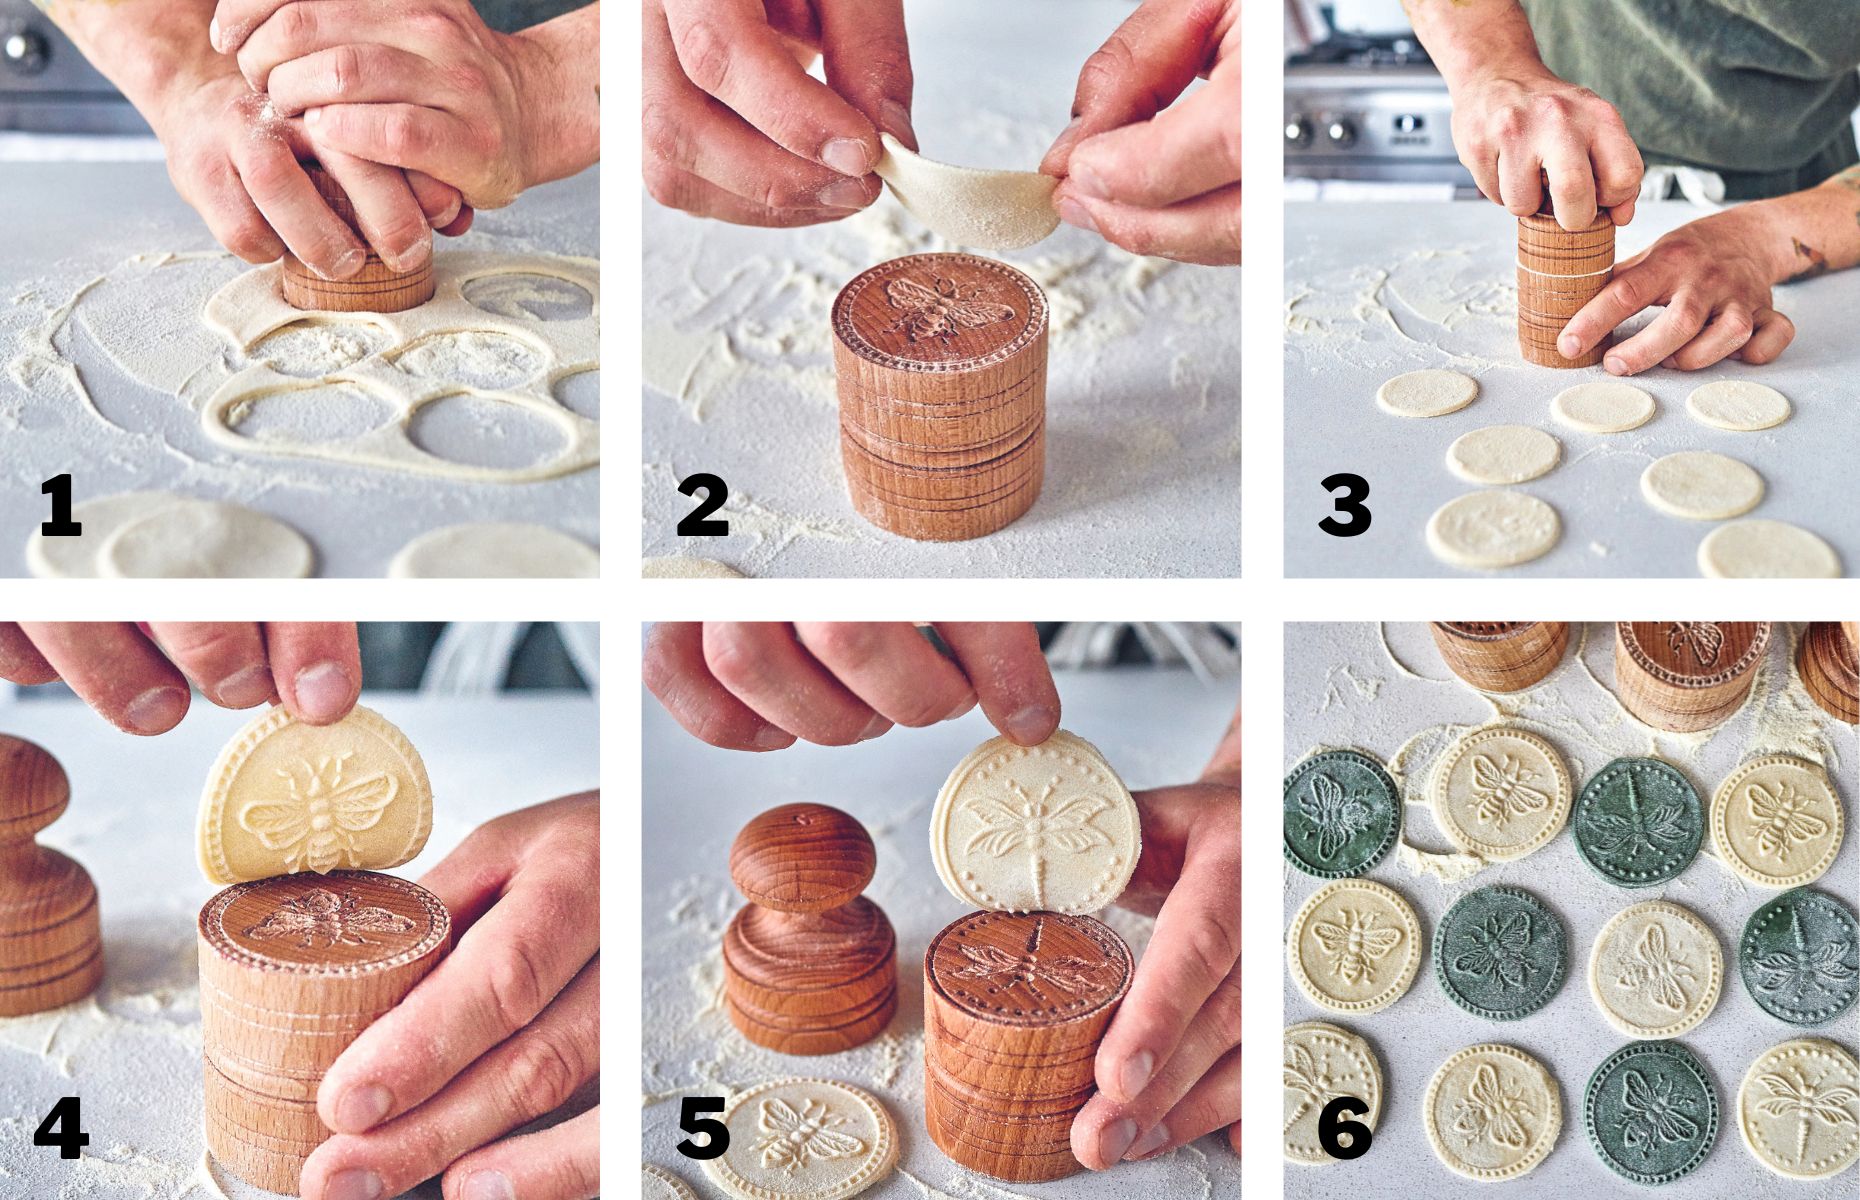
Step-by-step corzetti making (Photography: Dave Brown)
For the walnut sauce:
- Bring a small saucepan of water to a boil, add the walnuts and boil them for 5 minutes. Drain them straight away and allow them to cool.
- Soak the bread in the milk, ensuring it’s completely covered by the liquid. After 5 minutes, squeeze the bread and transfer it to the bowl of a food processor, keeping the remaining milk to one side.
- Add the boiled walnuts, garlic, lemon juice, olive oil and Parmesan and start to blend. Slowly pour the milk through the funnel of the processor until the mixture starts to look like porridge – a thick, grainy paste. Transfer the sauce to a large clean saucepan and set aside until you’re ready to cook the pasta.
- Bring a large pan of water to a boil before seasoning it with a generous amount of table salt. Drop in the corzetti and boil for 2 minutes.
- While they are cooking, scoop out a ladleful of the pasta cooking water and pour it into the sauce, which should now be set over medium heat. Stir in the water to create a looser sauce and season to taste with sea salt and freshly ground black pepper.
- Drain the pasta, reserving a small jugful of the cooking water, and add the corzetti to the sauce. Stir together with a large spoon and add more of the pasta cooking water if needed. Taste and adjust the seasoning, to taste. Serve at once.
Recipe adapted from Pasta Masterclass by Mateo Zielonka. (Quadrille, £26) Photography: Dave Brown
You might also like:
Pasta Grannies' spaghetti with lemon pesto recipe
Deliciously Ella's creamy beetroot and walnut spaghetti recipe
Most Recent


Comments
Be the first to comment
Do you want to comment on this article? You need to be signed in for this feature